| Harry/Materials |
Adding MaterialsThe next step is to apply some materials to the character. You can continue from the previous chapter or start from scratch by loading the example project 'tutorprojects/harry/body.r3d'. Select both spheres (eye1 and eye2) from the select window; you can do this by dragging a selection box around the two object names, or by Shift clicking them. Keyboard modifiers work on the select window exactly the same way as in the view window. You can also click the spheres in the view window to perform the selection there, although it can be harder there if other objects overlap the desired targets. Note how objects become highlighted at selection. Switch to the second tab of the select window, which contains a list of materials. By default, material names are displayed, but you can also get their preview icons by selecting 'Show Previews' from the popup menu. Drag and drop a material called 'glass', from the select window into the view window. This assigns the dropped material to the selected objects. Note that object selection, not drop position, defines the targets for material assignment.
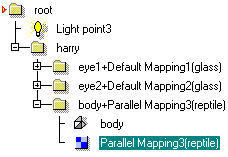
If glass is not in the library, select New/From Template from the popup menu and use the file browser to find and load it in (file 'materials/combined/glass'). Click the body mesh on the view window to select it. Make sure that the mesh is no longer in Edit mode. If it is, hit the spacebar to turn edit mode off. This is important because dropping a material to a SDS object in edit state may apply the material only locally. Drag and drop a material 'reptile' to assign a bump map to the body. Let's do a test render. Rotate (Alt-RMB drag) and zoom (Shift-RMB drag) the view to find an appropriate viewing angle. Then click the ray trace icon (on the bottom right corner of the screen) or hit the zero hotkey '0'. Most likely the bump map pattern, which makes the skin wrinkled, needs some scale adjustments. Perhaps the bumps are too big? Switch to the leftmost geometry tab of the select window. The body mesh has been dropped into a new level with a parallel map object. Select the parallel mapping - it is the object, which attaches the reptile shader to the body geometry.
On the view window, move the mouse pointer on top of the little scale knob at the end of red axis line (other knobs will do as well). Press Shift key down and drag the knob towards the handle center. Release LMB when the map geometry has shrunk sufficiently.
Render the view. Now bumps are smaller. However, they appear much steeper because the height did not change in density scaling. To adjust bump height, switch back to the material library on the select window, double click the Reptile material to open the property window and change the Bump Height value (default 0.01 m = 1 cm) to a smaller value, such as 0.002 = 2 mm. So, type 0.002 in the Bump height box and hit Enter. You can now close the property window. Now bumpiness is OK but there is one problem: bump pattern is tied to the body geometry along a rigid parameter grid, defined by the parallel map box. The simple box cannot follow when Harry for example bends its leg. Therefore, we must convert parallel map based pattern to a pattern that is fixed to the actual vertices defining the body. There is a tool for this purpose. On the geometry tab of the select window, select both the body mesh and the parallel mapping. Go to the Materials tab of the toolbar and activate Map2Obj tool. The default options, Target=Points, Source =Map Coords and Destination=UV Coords are suitable. This will evaluate and store parallel map coordinates into every point of the SDS mesh. Hit Accept. Now you can delete the parallel map object (use Delete hotkey or Edit/Delete pull down menu). Then select the parent level of the body mesh. Switch to the materials tab ob the select window. Make sure that Reptile is still highlighted, and select Map/Default from the popup menu. This creates a new kind of material map, which uses UV coordinates. UV coordinate values are stored into vertices, so they will not change when the model deforms. Save the project.
|


 |
 |